Filter replacement and installation
The Infinite® F50 must be connected to Magellan™ in order to do a software-guided filter insertion or replacement. If the connection is lost during the procedure (due to accidental interruption of the connection between the instrument to the computer), Magellan™ must be terminated and the instrument switched off. In this case, continue the procedure as described below. When finished, re-establish the connection by restarting the device and Magellan™ and define the newly inserted filters.

Filter replacement
The filters of the standard filter wheel can be replaced or supplemented using the following procedure:
1. In the wizard list window, click “Miscellaneous”.
2. Click “Instrument control”.
3. Click “Define filter slides”.
4. Click “Filter switching” to start the procedure.
5. Remove any microplate from the plate transport.
6. Tilt the instrument carefully backwards until it lies on the back side with the bottom facing towards you.
7. Remove the cover plate from the bottom of the instrument by removing the orange screws.
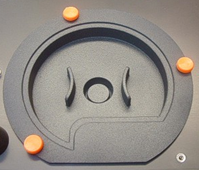
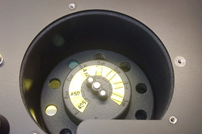
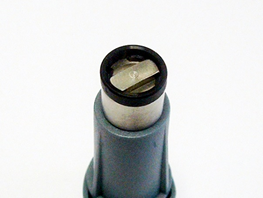
8. Remove the magnetically fixed filter wheel by carefully pulling it out of the instrument.
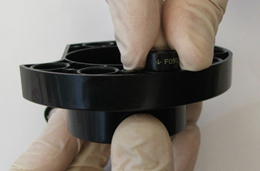
9. Place the filter wheel on a clean flat surface.
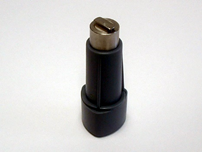
10. When replacing a filter, use the filter assembly tool to remove the filter from the filter slot. Contact your local Tecan® sales representative for the filter assembly tool and available filters.
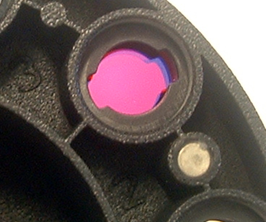
11. Align the filter assembly tool with the notch of the stop-ring. Turn the tool and remove the stop-ring by pulling it out of the filter slot.
12. Turn the filter wheel over so that the filter slides out of the slot. Do not use the filter assembly tool to push filters out of the filter slot. The filter could get scratched.
13. Insert a new filter into the filter slot in the correct direction, taking care not to scratch the filter or get fingerprints on it.

14. Place the stop-ring on the end of the filter assembly tool and turn it so it cannot slip off.
15. Using the filter assembly tool, push the stop-ring into the filter slot and press firmly into place.
16. Rotate the tool until the notch in the stop-ring is aligned with the end of the filter assembly tool and remove the tool.
17. Place the filter wheel back into the filter wheel slot and push it deeper until it is secured magnetically.
18. Reattach the cover plate back onto the bottom of the instrument with the three orange screws.
19. Bring the device back into an upward position.
20. Click “OK” to finalize the procedure and initialize the filter wheel.
21. Define the newly inserted filter (see below for detailed procedure).
Defining filters
In the “Filter Definition” dialog box, assign appropriate wavelengths to the replaced filters by entering the new wavelengths in the corresponding positions.
If a filter has been inserted into a new filter position, activate the appropriate filter position by selecting the check box and entering the appropriate wavelength.
Click “Save” to save the filter definitions and initialize the filters.
Once the filters have been initialized, the instrument is ready for measurements.

Further help
For further help during or after the installation process, please refer to our Helpdesk.
Link to Tecan Product Page:
Infinite® F50 Plus und Infinite F50 Robotic
401819-004