Usual root causes
The microplate washer is not aspirating or dispensing liquid, so some wells are not washed or liquid remains in processed wells. These anomalies are common symptoms of clogged needles.
Typical solution
Cleaning procedures
Caution
Adhere to applicable safety precautions, including wearing powder-free gloves, safety glasses and protective clothing, to avoid coming contact with potentially biohazardous material.
The most important cleaning procedure is to rinse the liquid system with distilled water before the instrument is left to stand or switched off at the end of each day. Also, remove and thoroughly clean the wash head at least once every six months or whenever one or more of the needles are blocked.
Cleaning the wash head
Important
The rinse procedure is the most important daily cleaning step for the instrument. If the wash head is not rinsed daily, blockages can occur. If this occurs, the wash head will need expensive repairs or will have to be replaced.
WARNING
Do not operate the instrument without the mist shield in place. Always wear disposable powder-free gloves, safety glasses and protective clothing when removing, installing or cleaning the wash head.
Follow these steps to successfully remove blockages in the dispense needles.
- Switch ON the instrument.
- Perform the procedure below “Instrument left standing for a longer period of time.” This procedure prepares the instrument to stand for a longer period of time by priming the wash head with air to remove all liquid.
- Remove the wash head as described below under “Installing/replacing the wash head.” Remove the wash head carefully from the instrument, taking care to not lose the seals.
- Immerse the wash head in an ultrasonic bath filled with warm distilled water (50°C max) for 5–10 minutes. This procedure removes most of the salt crystals blocking the needles. Remove the wash head from the ultrasonic bath and use compressed oil-free air to carefully remove any remaining particles in the needles.
- Ensure that all four seals (on the front and the back of the wash head) are in place.
- Repeat steps 4 and 5 until all needles of the wash head dispense correctly.
- Install the wash head again according to instructions under “Installing/Replacing the Wash Head.”
- Prime the instrument using distilled water.
- If single needles remain blocked, the wash head can be cleaned using the cleaning needles from the accessory box. To do this, carefully push a cleaning needle into the blocked aspirating or dispensing needle, and then rinse the wash head with distilled water to ensure that all particles have been removed.
Instrument left standing for a longer period of time
If the instrument is to be left standing over the weekend or for a longer period of time, the liquid system must be rinsed and afterwards primed with air to remove liquid from the tubing and liquid system. This prevents clogging and bacterial growth.
- Connect a liquid tube to a bottle with distilled/deionized water.
- Prime with distilled/deionized water. Repeat as necessary.
- Repeat the priming with distilled/deionized water for each channel to remove wash buffer.
- Connect the liquid tube from the primed channel to an empty liquid bottle.
- Prime the channel with air until the tubes are empty.
- Repeat 5 until the tubes are empty for each channel (connect the liquid tube of each channel to an empty liquid bottle).
- Now the instrument can be switched off.
- Empty the waste bottle, as well as the foam trap if necessary.
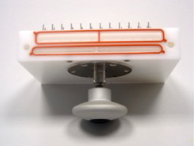
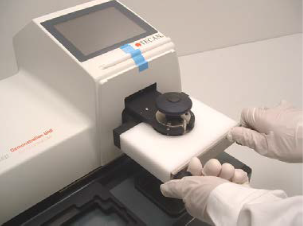
Installing/replacing the wash head
The wash head is delivered in a separate package.
When replacing the wash head, perform the steps in “Removing the wash head” first, then perform the steps in “Installing the wash head”.
Installing the wash head
- Switch on the instrument and initiate the “Replace wash head” procedure.
- Check that the seals on the front and back of the wash head are in place and are neither kinked nor twisted.
- Pre-wet the installed gaskets on wash head with distilled/deionized water.
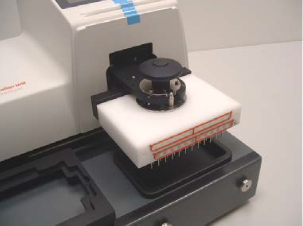
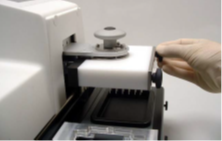
- Slide the wash head onto the wash head arm until it makes contact with the black bar that carries the tubing.
- Lift the wash head and the black bar upwards together to bring them to the same level.
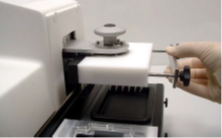
- Carefully tighten the knob on top of the wash head while holding the wash head and black bar in place. Re-check the alignment between wash head and black bar (the gasket should not be visible).
- Install and hand-tighten the front plate to secure the wash head into place.
- Note: Make sure that no seals are lost and that they remain within the seal channels on the wash head. Failure to do so can result in leaks. When screwing the metal plate to the wash head, tighten each screw by small amounts, doing so until both screws are securely fitted.
- Attach the mist shield.
- The message “When wash head is replaced, press OK to continue” appears on the touchscreen. Press “OK”.
- Switch the instrument off and on again. The instrument will automatically recognize the new wash head.
- The screen with Program Favorites appears and the instrument is ready for use.
Removing the wash head
Warning: After the instrument has been used, the wash head may be infectious! Before the wash head is removed, it must be thoroughly disinfected.
It is advisable to adhere to applicable safety precautions,(including wearing powder-free gloves, safety glasses and protective clothing, to avoid coming contact with potentially biohazardous material.
Warning: Before replacing or removing the wash head, the liquid system must be primed with distilled/deionized water first and then WITH AIR to remove liquid from the wash head.
Warning: Initiate the “Replace wash head” procedure when removing or replacing the wash head. Otherwise there is a risk of injury from the wash head moving.
- Make sure that the instrument is switched on before removing the wash head.
- Connect a liquid tube to a bottle with distilled/deionized water.
- Prime the connected channel with distilled/deionized water. Repeat as necessary.
- Repeat priming with distilled/deionized water for each channel to remove the wash buffer.
- Connect the liquid tube from the primed channel to an empty liquid bottle.
- Prime the channel with air until the tubes are empty.
- Initiate the “Replace wash head” procedure on the instrument.
- Remove the mist shield.
- The message “The wash head is ready to be replaced” appears. Press “OK” to start the procedure.
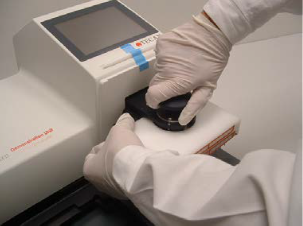
- 10.Remove the screws and the metal plate from the front of the wash head.
- Loosen the knob on the top of the wash head.
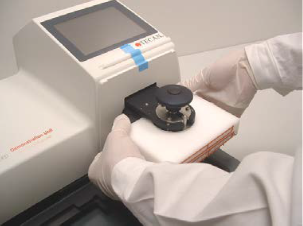
- Slide the wash head off of the wash head arm.
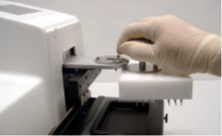
- Before storing the wash head, dry it with oil-free pressurized air.
- We recommend storing the removed wash head in the original packaging.
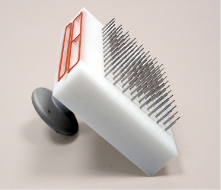
If you need to set the wash head down for a short time, make sure to set it down as shown in the picture above, otherwise it can fall over and the needles can become damaged.
Caution:
Do not set the wash head down on its needles, as this will damage them.
Further Recommendation
Make sure to follow a constant maintenance schedule for your instrument (please check the instructions for use).
Daily
Daily maintenance of the instrument:
- Perform daily procedures according to the instructions for use (e.g., “Instrument left standing for a longer period of time”).
Weekly
- Perform daily maintenance.
- Check the filter(s) in the liquid bottle(s) for particles and clean liquid filter(s) with distilled water or a mild detergent.
- If necessary, clean the plate carrier.
- If necessary, clean the wash head using the provided cleaning needles. If blockages in the needles are visible, clean the wash head according to the instructions for use (see “cleaning the wash head”).
- If necessary, clean the wash head in an ultrasonic bath according to the procedure described in the instructions for use (see “cleaning the wash head”).
- If necessary, clean the outer surface of the instrument with distilled water or a mild detergent.
Every Six Months
- If necessary, clean the plate carrier.
- Check the centering mechanism of the plate carrier and, if necessary, clean it with 70% ethanol.
- Clean the wash head according to the instructions for use (see “cleaning the wash head”).
- Perform the decontamination/disinfection procedure.
Yearly
- The yearly maintenance is performed by the service engineer. If any anomalies or difficulties arise, please contact your local customer support representative.
- Clean the filters in the bottles and replace if necessary.
- Check that the quick-release connectors on the external tubes and bottles are working and replace if necessary.
- Check bottles for damage and replace them if necessary.
- Check the integrity of the filters between the foam bottle and the vacuum pump and replace them if necessary.
- Decontaminate and disinfect the instrument according to the instructions for use.
- Clean the wash head according to the instructions for use and replace the seals if necessary.
- Clean the plate carrier.
- Clean the prime tub, check that it is still in working condition and replace if necessary.
- Check the dispensing pump using the QC-procedure described in the instructions for use
- Check the residual volume using the QC-procedure described in the instructions for use.
Next steps
If the issue cannot be resolved, contact Tecan® to schedule an onsite intervention or to send the instrument for in-house repair.
- Note your instrument serial number.
- Create a service request and include the serial number.
Helpdesk Tecan
Further help
Link to Tecan Product Page
401820-008