No liquid is dispensed into some wells or liquid is not aspirated from some wells
HydroFlex™ needles clogged
1. Usual root causes
The washer is not aspirating or dispensing system liquid, some wells are not washed, or liquid remains in some of the wells.
All of these issues are common symptoms for clogged needles.
2. Typical solution
Caution
Follow applicable safety precautions, including wearing powder-free gloves, safety glasses and protective clothing, to avoid potential contamination or contact with biohazardous material.
The most important cleaning procedure for this instrument is to rinse the liquid system with distilled water before the instrument is left to stand or switched off at the end of each day.
The manifold should be removed and thoroughly cleaned at least once every 6 months or whenever one or more of the needles is blocked.
Cleaning the liquid system
The manifold can be cleaned by the following methods:
a. Using the supplied cleaning needles (accessory box). The small cleaning needle is for the dispensing needles, and the large cleaning needle is for the aspirating needles. Carefully push the cleaning needles into the aspirating and dispensing needles. Rinse the manifold block with distilled water to ensure that all particles have been removed.
b. Using a gentle ultrasonic bath of warm distilled water for 15 minutes.
c. Autoclaving at a maximum temperature of 130 °C up to a maximum of five times. The manifold must first be removed from the instrument.
The manifold should be removed and thoroughly cleaned at least once every 6 months or whenever the needles become blocked.

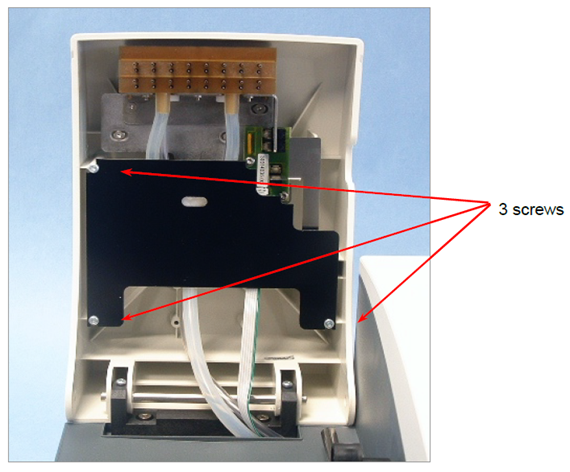
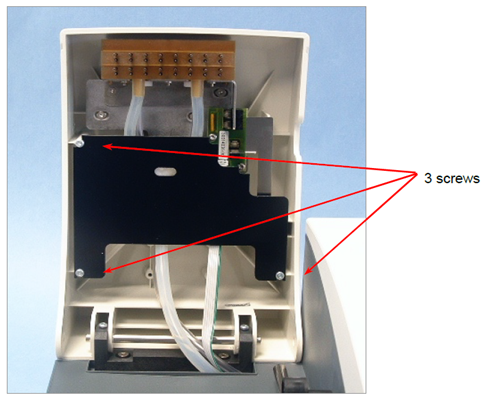
1. Lift the manifold arm and remove the black manifold arm guard plate by sliding it out from behind the three screws. The screws do not need to be removed to perform this step.

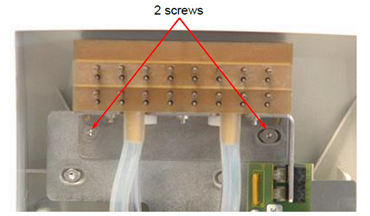
2. Lift the manifold arm and remove the two screws that attach the manifold to the instrument using the hex key provided.
3. Carefully pull the tubing off the connectors on the rear of the manifold and remove the manifold.
Reinstall the manifold using the following procedure:
1. Lift the manifold arm.
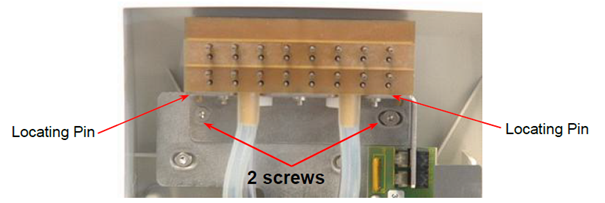
2. Carefully fit the manifold onto the manifold arm and ensure that the locating pins are correctly inserted through the holes in the bracket.

3. Tighten the manifold into place using the two screws and the hex key provided.
4. Fit the dispensing tubes (marked blue) onto the top connector on the rear of the manifold.
5. Fit the aspirating tubes (marked red) onto the two bottom connectors on the rear of the manifold (marked with red labels).

After the manifold has been cleaned and reinstalled, switch the instrument on and perform the priming procedure using distilled water.
Caution
If additional cleaning is required, use the delivered cleaning needles and adhere to applicable safety precautions, including wearing powder-free gloves, safety glasses and protective clothing to avoid potential contamination or contact with biohazardous material.
3. Further recommendations
Make sure to follow routine maintenance procedures:
Daily
1. Prime the liquid system if necessary.
2. Perform “Rinse Day” with distilled water or wash buffer, if the instrument will be left to stand for a short time (up to 2 hours).
3. Perform “Rinse Night” only with distilled water, if the instrument will be left to stand overnight.
4. If necessary, due to particles, soiling, etc., prime the instrument several times with distilled water.
5. If the instrument will be left to stand for a longer period of time (more than one day), prime with distilled water and then prime without liquid.
Weekly
1. Perform “Rinse Night” with distilled water.
2. Prime the instrument without liquid to empty the entire liquid system.
3. Check the filter(s) in the liquid bottle(s) for particles and rinse the liquid filter(s) with distilled water.
4. Clean the plate carrier guide bar with 70% ethanol.
Every 6 months
1. Clean the plate carrier guide bar with 70% ethanol.
2. Check the centering mechanism of the plate carrier and, if necessary, clean with 70% ethanol.
3. Clean the manifold, aspirating and dispensing needles using the cleaning needles supplied with the instrument.
Note: Clean the aspirating and dispensing needles periodically or immediately if they become clogged with particles or crystals.
Yearly (service engineer required)
The yearly maintenance must be performed by the service engineer.
4. Next steps
If the issue cannot be resolved, contact Tecan® to schedule an onsite intervention or to send the instrument for in-house repair.
• Note your instrument serial number.
• Create a service request and include the serial number.
Further Help
Link to Tecan Product Page
HydroFlex™ Plus microplate washer
401776-010