The Inline Filter Check command is used to detect clogged or damaged filters. In order to protect the Flexible Channel Arm with Air system (Air FCA) pipetting channels against over-aspiration of liquid a control system is installed on each channel. This control system combines a filter inside the brass DiTi cone at the bottom of the channel and the pressure monitoring of the PMP board. With the Inline Filter Check command, we can check that the filter inside the DiTi cone of an Air FCA pipetting channel is clean, uncontaminated, and undamaged. This check is usually done at the beginning and end of the script. This test can detect failures such as:
- Wet inline filter (due to over-aspiration of liquid)
- Damaged filter
- Wrong positioned filter
- Absence of filter
- Channel clogged with particles
The Inline Filter Check is performed at the current position unless Fluent needs to drop DiTis and perform the test over the DiTi waste. If the test succeeds, then the measured values are written to the log file (search for the Action "InlineFilterTest" in the Log Channel "Tecan/FluentControl/Instrument/FCA" to find the results). Plunger motion is now enabled for the selected channels for the rest of the script. If the test fails you get an error message, and the run is aborted. The channels that do not pass the test are not available and replacement of the inline filter is needed.
How to change the Inline filter
To change the inline filter, we first need to remove the DiTi Cone. Please, use only the DiTi cone wrench to unscrew the cone.
- Switch off the instrument.
- Open the front safety panel.
- Manually raise all the Z-rods to their uppermost positions.
- Move all the Z-rods towards the front of the instrument.
- Spread the Z-rods as wide as possible.
- Hold the tip adapter (D) and tip ejector tube (C).
- Unscrew the DiTi cone (A) using the DiTi cone wrench (B).
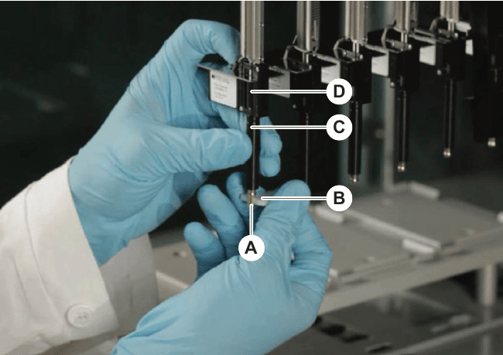
- Pull down the DiTi cone carefully.
- If the entire DiTi Option is removed instead of just the brass cone, grip the metal cylinder and continue to unscrew the brass cone with the DiTi wrench. It is important that no tools other than the DiTi wrench are used.
After you remove the DiTi cone proceed to replacing the inline filter.
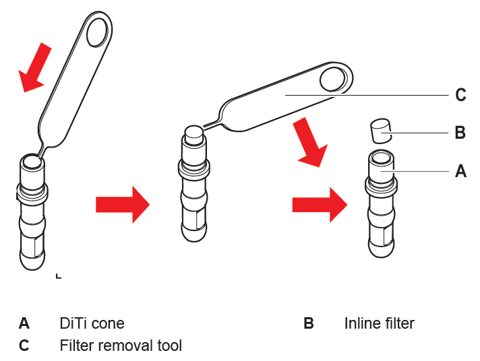
- Pierce the inline filter (B) sideways with the filter removal tool (C).
- Pry out the inline filter with the filter removal tool. Note that the filter may be contaminated with process liquids.
- Dispose of the inline filter.
- Clean the DiTi cone (A) with alcohol. DiTi cone must be dry before refitting.
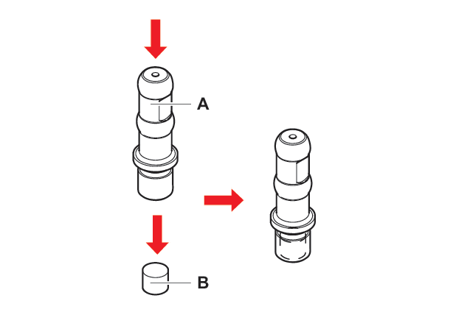
- Place the new inline filter on a clean and flat surface.
- Press the inline filter into the DiTi cone. The inline filter must not protrude from the DiTi cone.
- Check the inline filter according to the method defined by your key operator.
Additional information
By detecting the pressure change which occur if liquid comes into contact with the system’s inline filters, the system is able to stop the aspiration immediately, preventing liquid from entering the air chamber. The inline filter cannot prevent aerosols- only filtered DiTis can.
Further Help
For further help, please refer to our Helpdesk.
401815-019